Showing posts with label cookies. Show all posts

Thursday, December 23, 2010

A Beery Good Dinner


We have known Mike for years in various capacities, including music (he and I played in an orchestra together while he was in high school and drove to rehearsals each week together, including one snowstorm where neither one of us could see the road) and Rachel playing regularly with his sister and then it all just moved from there for her and Mike and that's all I'm going to say.

We were thrilled to learn Mike is a regular LTIR reader AND that he makes his own beer. When he noted on facebook he was hosting a beer pairing party, I asked him to share ... which he has in wonderful detail and with photos aplenty. So, without further ado, let the beer pairing begin!

Hi Janet and Rachel -

My little beer dinner the other night was a HUGE success. Everything was paired perfectly, and overall, we were very happy with how the food turned out. Big thanks to my sister (who was in town for my graduating recital a few days earlier) and my boyfriend, who is an excellent cook and an even better party planner...

I’ve been making my own beer for a few years now; I started when I was living in Boston and it has progressed and evolved into a crowd pleaser for my friends and family. And of course, if you bring your own homemade alcohol to any party, you INSTANTLY have tons of friends. As my friends and I have been partying together for the last few years, I have consistently been bringing different styles of beers to our gatherings. The problems becomes that as I only bring a single growler (about 4 pints worth), many of my friends don’t get a chance to drink any!!! I just run out!!

So I decided to host a party pairing my favorite styles of beer with food to go along with them! I must admit, though, that I did make a beer that I had never made before. .. BUT it turned out amazing! All of my decisions basically had to be made 3 months in advance, since that’s the amount of time I needed in order to get all the styles done, have them ferment, and age and condition properly.

So here is everything that I have done, including the beer recipes. The food recipes are either things we just put together from epicurious.com, or from family/friends’ recipes. The beer recipes are mostly based on recipes by Jamil Zainasheff (available in publication and free online ... just google it all) and have been changed by me over time. I’m not going to write out all the steps needed to brew the beer. If people are interested in recreating the recipes, there are tons of resources out there if they are novice brewers; try northernbrewer.com, howtobrew.com, or they can email me for my specific process. All of the recipes were designed to please a crowd of people ... I’m sure you could increase or decrease as needed!

Cheers

-MW


Carrot and Squash Soup with Bacon & Rosemary
Paired with a Scottish 60/- (reads “60 shilling”)
Not subtle, just quiet... with notes of toast, honey, and very smooth
ABV 2.5%

Soup ingredients

1 acorn squash
Butter
Brown sugar
3 lbs of carrots, peeled and diced into 1-inch chunks
2 medium onions in 1 inch pieces
Chicken stock to cover
1 rounded teaspoon ginger, peeled and grated
1/2 rounded teaspoons each of Allspice, ground cloves
Red pepper flakes (just a dash)
Salt/Pepper to taste
Garnish with rosemary and bacon

method
Heat oven to 300 degrees. Cut the squash in half and scrape out the seeds; place two pats of butter on a rimmed baking sheet and top with brown sugar; invert the squash halves on the butter, and bake for 45-60 minutes. (We added a bit of water to the bottom of the baking sheet to keep the squash from sticking).

While the squash is baking, prep the carrots and the onions and put them in a big stock pot. When the squash is done, scrape out the flesh and add it to the stock pot. Cover the veggies with chicken stock and bring to a boil. Reduce the heat to a simmer, add the spices, and cook until all the veggies are tender. To finish, let the soup cool overnight (first on stove top and later in the fridge), and then puree in a blender. Reheat and serve! Garnish with bacon and rosemary chopped up (the rosemary is from my indoor herb garden ... ok ok, I have this plant and a basil plant, but it’s a garden, right?!?!?!).


Scottish 60/ Beer
(all beer recipes are for 6 gals at the end of the boil, 5 ½ gals fermented, 5 gals in keg/bottle)

This is an easy-drinking pub ale. Like many people, I use a beer like this to grow yeast. I’ll pitch 1 commercially bought package of yeast, ferment the beer, and then collect the “offspring” to re-pitch into more beers (usually I can get 3 or 4 beers off of a first generation). This is one of the ways I maintain my house culture. When I feel the yeast has given me all it’s going to (after about 5 or 6 generations), I’ll either buy another commercial package or build up a culture off of a plate (my friend, who is a scientist and works in a lab doing all sorts of experiments, plated the yeast for me!). So I keep this beer on hand, not only for function, but it has a lot of flavor for an easy drinking beer.

ingredients
1.038 SG, 1.010 FG
5 ½ lbs base malt (I use American 2-Row for just about everything. Continental malts will definitely add more flavor, but I don’t always have it on hand.)
½ lb Munich malt
1 lb Crystal 40
½ lb Honey malt
¼ lb Crystal 120
3 oz Pale Chocholate
⅔ oz East Kent Golding hops for 60 min
House Yeast (I have been keeping an active culture of Pacman yeast for a while now, which is what I used... Jamil uses WY1056 or WLP001, available from Wyeast and White Labs)

method
Mash at 158*, sparge and lauter as normal. Add hops as indicated. Cool and pitch a good amount of yeast. Ferment WY1056/WLP001 at 65*, but I went around 62* with Pacman. Cold condition for a few months will round out the flavors and mellow the bitterness. Carbonate on the low end. When I served this at the party, I brought the keg up to cellar temperature (we have an area of the basement level that is just around 52*) and served off of a portable CO2 charger rather than with my big tank. The result was very similar to cask, which would be more authentic. If I were to try this again for a party, I would naturally carbonate in a “cube,” which is available online, and serve with gravity rather than forced CO2.


Moules-Frite
s
Traditional Belgian dish of Mussels in broth with Potato Pancake “frites”
Paired with a Belgian Saison
Sweet, spicy, sour, funky
ABV 6%
This is a traditional Belgian dish with an AWESOME Belgian/French style beer. Both are some of my favorites (if you’re not familiar with Saisons, it can be sweet or dry, high or low in alcohol, spicy or fruity, sour or clean; it’s a very versatile style. Jamil writes that it should be dry, and I agree to some extent, except that I think some residual sweetness adds to the spicy complexity. But he is an expert, so it’s ok to trust him and not to trust me!!! Regardless, this is probably my favorite style of European beers). We were very lucky to find Cape Cod mussels flown in right on the morning of the party. Instead of fries, we opted for Potato Pancakes, just to make it a little different. The pancakes were made a few days before the party; the mussels were done right before serving!

Pancake ingredients
5 lbs potatoes
3 medium onions
3 eggs
Flour
Salt/Pepper
Lots of oils... to fry with

method
We started (and when I say we, I actually mean my sister) by grating the potatoes and the onion. Poor Sarah did this by hand, since we don’t have a food processor. Add a few eggs to hold everything together; add another if you think it needs it. Same thing with the flour. Please season liberally (there’s nothing worse than bland fried potatoes!) and fry away. We drained the excess oil with paper towels. Since we knew we would keep them in the fridge for a day and then reheat in the oven, we slightly under-cooked the pancakes.

Mussels ingredients
Olive Oil
Shallots
Garlic
White wine
Chicken Stock
Tomatoes, diced
Mussels

The pot that was big enough to cook all of the mussels (we used about 4 lbs for a crowd of 20, with enough to go around for people to have seconds, thirds, even fourths!) had a flimsy bottom, so we had to build the broth in one pan and then transfer it to the big pot.

Heat a pan; add the olive oil and, after it's hot, saute the shallots and garlic. Deglaze with the wine, add stock, and bring to a boil. (From here, we transferred the broth to the bigger pot and added more wine and stock so that we didn’t scorch the bottom of the pan. if you’re using the same pan or pot, just keep everything happy where it is!) Add tomatoes and bring everything back to a boil. Add the mussels (make sure they are all washed first), and steam just until the mussels open, about 6-7 minutes. Because we were making so many, we stirred the mussels every so often so that the ones on the bottom didn’t cook faster than the ones on top.

Belgian Beer
This beer is very difficult to ferment. I actually made 2 batches for the party, since I didn’t like the way the first came out (it’s the same recipe for both batches; I just monitored the fermentation better). In the past and in the batches I made for the party, I used WLP565, but in the future I will try a blend of yeasts that White Labs has available. Supposedly, you get all the flavors of the straight-up Saison yeast, but without the crazy fermentation problems!

ingredients
1.066 SG, 1.012 FG
7 ¾ lbs Light LME
1 ½ lb Cane Sugar
½ lb Munich LME
½ lb Wheat LME
2 oz CaraMunich (steeped)
1 ½ oz East Kent Golding hops for 60 min, ½ oz EKG hops at end of boil
WLP565 Saison Yeast

method
Do your normal extract with steeping-grains process: steep, add your extract, boil with hop additions, cool, ferment, etc. I began fermentation around 70* and raised to about 80 or 85 over the course of a week. Carbonate on the high end, but not too high, since that will mask many of the subtle yeast flavors!


Korean Style Braised Beef

Served with Mushrooms, Carrots, Kimchi, and Pickles
Paired with a Dark Belgian Saison
Dark as Midnight, earthy, musky, and funky
Partially fermented with Brettanomyces
ABV about 5.5%
Many of my friends in Boston are of Korean decent. One friend in particular, who is also an amazing violinist, had a few of us over to her family’s home one night for Kalbi-chim, which is Korean Braised Short-ribs (I guess “kalbi” is the word for beef and “chim” is the word for braised). My boyfriend and I ended up making this for our Thanksgiving dinner, and it was so good I decided to use it for my party instead of what I had originally planned; this probably worked sooo much better! To make our Thanksgiving meal, I contacted my friend’s mother for her recipe, which is what I’ll give you below. It is a little confusing (seriously, I’ll give you exactly what I was given), but if you make it like a Korean mom with lots of time and love, it will be excellent. I wanted similar flavors for this dish, but didn’t want to spend a ton of money on beef ribs, so I opted for 1 ½ inch thick steaks of chuck roast. And I didn’t use chestnuts but substituted carrots instead. The pickles are homemade as well. This is the only beer I had not made before figuring out what I wanted for the party... definitely Belgian inspired (Belgian brewers are notorious for coloring outside the lines!) and certainly experimental!

Pickles:
ingredients
10:2:1 ratio of Water, Cider Vinegar, and Salt (I did 5 cups, 1 cup, ½ cup)
Kirby Cucumbers
Onion
Jalapeno Pepper
Garlic

method
Bring the water, vinegar and salt to a boil and keep it going for 20 min or so (I don’t know if that is what you’re “supposed” to do, but it made me feel better than if I didn’t do it). Meanwhile, quarter the onion and slice the peppers into ½ inch rounds; put all the veggies in a container (I used a big plastic thing with a sealing lid. I’m sure most people would use canning jars.) Once the boiling is done, let the liquids cool slightly and then pour it over your veggies. I let my pickles cool on the counter before putting them in the fridge. I had then heard from some source (which of course I can’t remember) that you should boil your brine again, just to ensure that it is sanitary. Being a beer brewer, this seemed reasonable to me. So 24 hours later, I drained my brine into a pot, boiled it again for about 10 minutes, and put it back over my veggies. I prepared the pickles about a week and half before the party, and they were amazing. As I write this a few days later, I tasted the pickles and I can feel the intensity strengthen from just sitting a few extra days!

Kimchi
I bought this from a local Asian market. I don’t think my roommates would like it if I fermented cabbage in our basement!
Beef
ingredients AND method
(I’ll list the ingredients I changed and my comments in parenthesis. Otherwise this is exactly what my friend’s mother, Yoo-kyung Kim, gave me.)
1.) Soak Kalbi in cold water for about an hour to get rid of the blood. (Again, I used mostly chuck, although I did add some thinly sliced short ribs and bones for flavor.)
2.) Boil Kalbi in water with an onion, quartered, until the meat becomes tender.
3.) Add sauce: 5 tablespoons soy sauce, 3 tablespoons sugar, 1 tablespoon farlic, 1/2 tablespoon ginger, 1/2 teaspoon pepper. She also writes, for one pack: you might have to put 3-4 times the amount, I never know (I just kept the ratios close when I made this for the party)
4.) Simmer until the meat becomes somewhat dark. Add Asian turnip, chestnuts, Shitake mushrooms, and simmer a bit longer (I didn’t use any turnips or chestnuts; I let my mushrooms soak for a few hours in water and added that juice along with my sauce in step 3, and, again, I used carrots.)
5.) Add green onions, sesame oil, and sesame seeds (I didn’t use green onions. I think I just forgot! And, I had looked up some other Kalbi-chim recipes online just to compare; some used honey or corn syrup to glaze the beef just before serving, so I did that too for the party)
For No. 2 you should have enough water to cover the Kalbi, since there will be less later as you simmer, and after No. 2, you should leave the Kalbi in a cool place overnight to get rid of the solidified fat. It is basically simmered Kalbi with sauce


Beer:
This is the only beer that I had not brewed before. It turned out AMAZING! The recipe is based from a kit Northern Brewer used to sell with a limited edition Saison yeast. I just used the same WLP565 yeast and added the Brett. when the Saison yeast stopped.
1.061 SG, 1.015? FG (the Brett. fermented out some of the residual sugars)

ingredients
10 lbs Base Malt
1 lb Cane Sugar
1 lb Munich Malt
½ lb Carafa III Special
2 oz East Kent Golding Hops for 60 min
WLP565 Saison Yeast
Brettanomyces Culture (I had a small culture stored in my fridge, so I made a starter and pitched that)

method
Mash low around 149* for 1 ½ hours. Ferment low and raise over the course of a week to 80 or so. Cool down to room temp as soon as the first yeast finishes, and pitch the Brett.; you can transfer the beer and then pitch the Brett., but I just used one carboy. Carbonate moderately (or less or more... it’s a Belgian Specialty Ale, after all)


Chocolate Chip Oatmeal Cookies with Orange-infused Cranberries
Paired with a Light Belgian Ale
Hoppy, spritzy, earthy, and complex
Partially fermented with Brettanomyces
ABV about 6%

Cookie ingredients
1 cup flour
½ teaspoon baking soda
½ teaspoon cinnamon
¼ teaspoon salt
10 tablespoons butter
½ cup sugar
½ cup packed brown sugar
1 large egg
1 teaspoon vanilla Extract
1 cup old-fashioned oats
½ cup each semisweet, milk, & white chocolate chips
½ cup dried Cranberries (I used the orange infused from Trader Joe’s)

method
Heat oven to 350 degrees. Mix together dry ingredients together in a medium bowl. Beat together butter and sugars in a separate bowl (with an electric mixer, if you’re not strong enough!); beat in the vanilla and the egg into the butter bowl. Add the flour mixture and the oats nto the butter mixture, and then mix in the chocolate chips and the cranberries. Drop by rounded tablespoonfuls onto the baking sheets about 2 inches apart. Bake for 16 minutes until the edges are slightly brown. Cool on wire racks. You can also make an “icing” of melted chocolate if you want (or your favorite recipe)!

Beer ingredients

I’m not really sure what I would call this. My original intention was a clone of a Belgian Trappist beer, Orval, but something along the way made me change my recipe slightly. I used a different yeast strain than I should have, and I think I intended to use more hops, but didn’t. Regardless if it is a clone or not, the beer turned out wonderfully, and I am very happy with the result!
1.064 SG, 1.008? FG (again the Brett. took care of some of the residual sugars)
10 lbs Base Malt
1 ½ lbs CaraMunich
1 lb Cane Sugar
2 oz Hallertauer hops for 60 min, 1 oz Styrian Golding hops for 15 min, 1 oz Styrian Golding hops at flameout, 2 oz Styrian Golding hops for dry hops
WY1368 Belgian Strong Ale
Brettanomyces Culture

method
Mash low around 149* for 1 ½ hours. Ferment low and raise over the course of a week to 70 or so. After fermentation has finished (about a week) pitch Brett. culture and hold at cellar temperatures for 4 week. Dry hop when you have 1 week left. (I think I kept the beer fermenting with the Brett. for about 6 weeks total). Carbonate high (nice and spritzy!)


Assorted Cheeses, Crackers, Olives, & Fruits
Paired with an American-style Barley Wine
Smooth, aged, hoppy, and complex
ABV 11%
Cheese Plate:
Barley Wines are very strong in alcohol and flavor, and require some age to meld all the flavors; they are perfect as an aperitif with a cheese place. I am fortunate to have an expert cheese shop in my area. I told the nice lady thre EXACTLY what I was serving, and she gave me some very tasty options for cheeses. We ended up with a Welsh Cheddar (very creamy), an Iowa Cheddar (very sharp and pungent), and a Dutch Gouda (very complex). I also served Mediterranean olives, crackers and dried papaya for some sweetness.

Beer:
This beer was about a year old. I only have a few bottles left and I am clinging on to them with every day that passes. The bottles showed no signs of contamination, oxidation, and hopefully will last for a few more years! Because my mash tun doesn’t fit 25 lbs of grain, I mashed about ¾ of the grain, and made up for the remaining gravity with DME. Rather than make a big yeast starter (I think I calculated I needed a starter of 2 gallons), I made a small gravity batch of a generic wheat beer, and pitched right on top of the trub... I may have over-pitched, but the result still worked out.
15 lbs Base Malt
3 lbs DME
1 lb Crystal 80
1 lb Crystal 10
¼ lb Special B
¼ lb Pale Chocolate
3 oz Warrior hops for 60 min, 1 oz each Centennial and Cascade hops at flameout
House Yeast

method
Mash at 149* for 1 ½ hours. Even though Pacman yeast can ferment as low as 60* and create be very VERY clean, I fermented at 65* for a little spice. Again, the beer is amazing and it has worked for me. Carbonate low to medium-low. Serve small quantities as you would a fine scotch!

Happy Brewing!

Wednesday, November 17, 2010

Cookies That Command Ice Cream


Hey Ma-

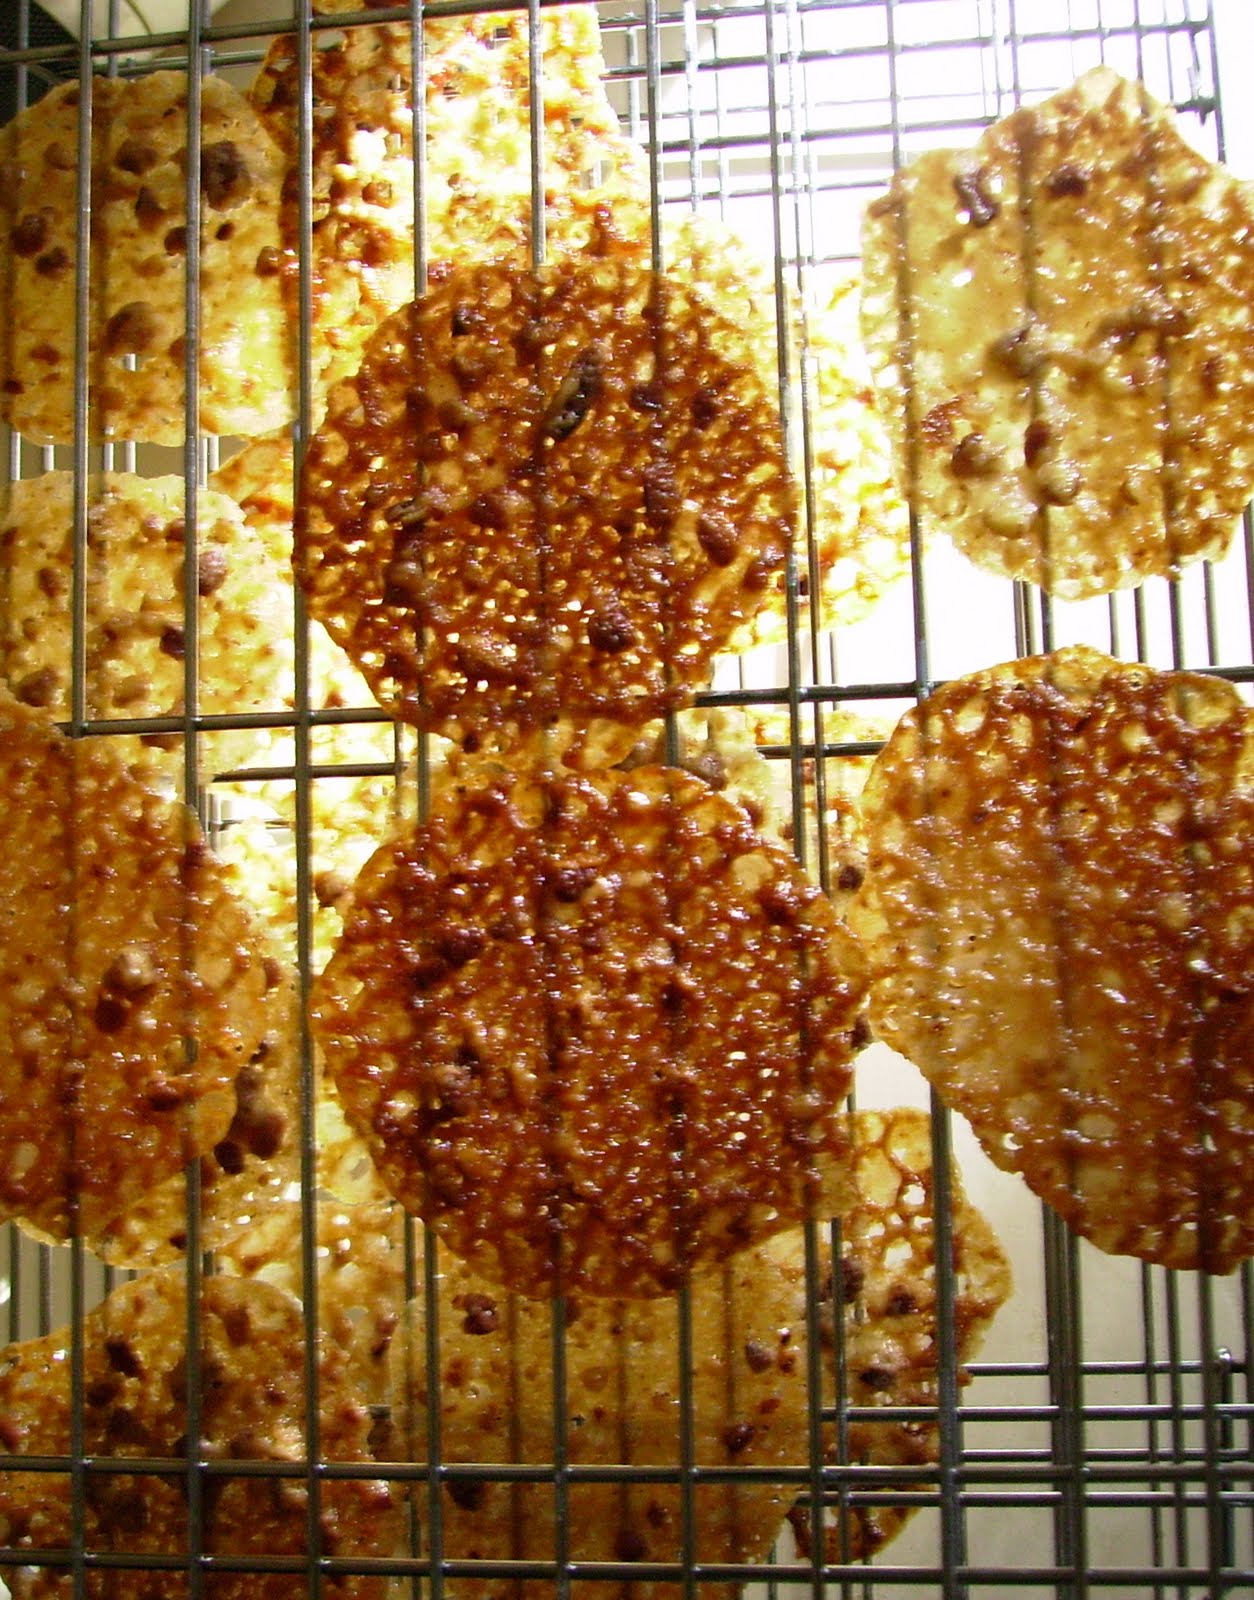
So, the other day in some odd moment of lull I was thumbing through Real Simple when I happened to notice a cookie recipe that they called super easy. I'd had cookies on the brain what with the round-up from last week and the recipes everyone's (yes, ahem, EVERYONE...that means send us one if you haven't!) sending us for our cyber recipe swap. Plus, sometimes when I see the word "easy" I take it as a challenge. You know those days where easy seems just completely and utterly impossible? And then something has the audacity to label itself easy to spite you? I was having one of those days and I decided I needed to show these Real Simple really!-simply!-easy! cookies what's up. I even went so far as to go to the grocery store to buy the one ingredient I needed to make these pecan lace drop cookies, all in the name of validating my sense that NOTHING is actually easy.


Oh man was I wrong. This is the view down through my cooking racks. It took but a few ingredients, a pot and a bowl to get this pretty view. And less than an hour! For all of these pretty little cookies! And goodness these lacy treats are good. Sweet and nutty and oh so delicate they're pretty darn tasty on their own, but one bite and I just KNEW they'd be even better with some vanilla ice cream.

This was totally one of those days when I set out to let the universe know once and for all that it sucked and it boldly decided not to spit in my face (as I had so hoped), but to give me a sweet little surprise.

To top the whole ordeal off (because clearly this was an ordeal, albeit a really excellent one in the end), I couldn't get good enough light at night to photograph with. And so, the day after I baked, I had no choice but to make a little ice cream sundae for lunch. Oh, the things I do to share my life in recipes with you, Ma.


Anyway, in case it wasn't clear, you should totally make these. I'm going to make them again and again and again. Click here to follow my lead.

XXOO
-R

Friday, November 12, 2010

C is for Cookies (and G is for Give Us Your Recipes!)


Hey Folks-

Rachel here. Remember a few days back when I wrote about wanting to collect recipes from all of you to create a little communal blogosphere cookbook (click here to read the post)? I thought that, to help get us all in the holiday baking mood, I'd do a round-up of our cookie posts from the past. Man have we--and our guest bloggers!--made a lot of cookies. Click on through and then let us know what your favorite cookie (or other foods!) recipe is.

Happy weekend!

XXOO
-R

Oatmeal Chocolate Chip Pecan Cookies and Glazed Molasses-Spice Cookies
Ultimate Ginger Cookies and Oatmeal Cookies with Raisins, Cranberries, Walnuts and Chocolate Chips
Emma and Sage's Oma's (Chocolate Chip) Oatmeal Cookies
Grandma Reynolds' Date-Nut Bars and Lemon Bars
Gigi's Veganized Carrot Sandwich Cookies
Homemade Honey Ginger Graham Crackers
Thick and Chewy Chocolate Chip Walnut Cookies and Chocolate Chocolate Chip Oatmeal Cookies
Mookies
Creamy Lemon Macadamia Cookies and Sugar Cookies

Thursday, April 8, 2010

Food for Thought Thursdays: Three Generations of Oatmeal Cookies

Rachel here: For this week's FFTT installment, we are delighted to feature my two lovely and amazing cousins, Emma and Sage (their mom, Kaja, posted a few weeks back). They've written their own fabulous pieces about themselves and the recipe they're sharing, so I won't say too much here other than that these two are just as vibrant, thoughtful, and generally fantastic as they seem. Thanks for sharing, girlies!

Emma here: I’m Jake’s niece and Rachel’s cousin and I live in Colorado. I just made these cookies with help from my little sister Sage- and they’re gone already. My Oma didn’t like chocolate- the only time she would eat it was when we were hiking- so when she made these cookies they were simply oatmeal cookies. But my mom added the chocolate chips and they now rule over all other cookies- they are my absolute favorite. I have to say, that as a growing high school student, I tend to eat some dough- and if you eat dough too- the best time to eat it (or simply lick the spoon) is right after you added the oatmeal and chocolate chips and you are slowly stirring the mixture. It was a Saturday afternoon and I had been dreaming about eating these cookies and my mom had finally bought some Quaker Oats (those are the best kind to use) and 2 bags of chocolate chips- no you only use about one bag- the other was simply for us. I never measure the oats though. My Oma was that way too. She never knew exactly how much to put in; it was always what looked and tasted good. So I’m actually not sure if the above amounts of oats and chocolate chips are correct- they are simply what taste good to me. I get the huge cylinder of oats and just begin sprinkling them in. Then I dump a fair amount of chocolate chips and just stir and taste and add some more. It is a wonderful process.

I actually don’t remember my Mom’s mom cooking these cookies all that much- what I remember was the simple stuff. Not the long process things- because I would soon disappear with my cousins into our boutique in the back yard. But she had a garden and I remember one morning she took me out- just me- and we picked some fresh blueberries. And then we came back inside and mixed them with freshly cut melon to make our own fruit salad. Then Oma went back into her kitchen and brought out the bag of sugar. She had a spoon and just sprinkled the smallest bits of sweetness onto the fruit. And then so did I, with maybe 2 spoonfuls. Then we ate breakfast just Oma and me and our blueberries. But it was the simple act of adding the sugar that enticed me and, to tie back into our cookie recipe, the sugar and butter are the absolute base of the cookie. And now, this recipe seems simple to me. I guess as you continue to make something, especially something so good, it tends to stick with you, and become a part of you.


Sage here: I am Sage Reynolds and I am 10 years old and I am Rachel’s (favorite) cousin. And I want to be a chef when I grow up. Whenever I bake oatmeal cookies, I will always ask my mom, “How much of this?” or “How much of that?”, and all she’ll say is, “Oh, however much you want.” When we bake the cookies, I will come running up to help cook them because, to tell you the truth, that is my favorite thing to cook. The recipe is different almost every time we cook these delicious treats.
Also, when Oma used to come over for holidays, she would always cook. And when Emma and I asked her, “Do you need any help?” she would just say, “No, no, no, I am cooking for you guys, you don’t need to help.”
I love baking these cookies, but I hate it when my sister eats all of the dough!

Our Oma’s (Chocolate Chip) Oatmeal Cookies
Ingredients
First bowl:
2 sticks sweet butter- soft
2/3 cups sugar- white
1 cup sugar- brown
3 eggs
In other bowl:
1 1/2 cups flour- add some for high altitude
1/2 tsp. baking powder
1/2 tsp. baking soda
1/2 tsp. salt
Then:
4 cups of oatmeal (ish)
2 1/2 tsp. vanilla
Almost a full bag of chocolate chips (about 3/4 of a bag)

Method
Preheat the oven to 350 degrees. Mix the butter and sugar together until combined and then add the eggs. In the other bowl, stir the flour, baking soda, and baking powder and then add the salt if you want to (we never do and it seems to be fine.) Then combine dry mixture into the butter mixture. Add the vanilla and thoroughly combine and then stir in the oats. Add in however many chocolate chips you desire and mix everything completely so that the oats and chocolate chips are evenly distributed. Spoon dough onto a greased baking tray and put in the oven for about 9 minutes. (Varying the size of each cookie is a wonderful idea- big cookies for Dad and smaller ones for Sage.) Then let them cool for about 3 minutes on the pan before removing them and placing on a cooling rack. Start next batch.

Thursday, April 1, 2010

Food for Thought Thursdays: Cookie Comfort


Janet here: While therapists and studies regularly point out how emotional eating is bad for you, it seems pretty clear to me that eating and emotions are inextricably and impossibly intermixed. Starting with a mother breastfeeding her baby, whose only needs initially are to be fed and held and protected — all of which are satisfied with the food she is sucking down — food not only nourishes us physically but emotionally as well.

Of course, we all get off the path of that original purity pretty quickly. Our parents withhold dessert for "bad" behavior, we give ourselves a "treat" to make us feel better when something bad (or good) happens — the list is endless and makes our relationships with food almost universally complicated, and that's without adding social stuff like stick-thin models and movies extolling only young thin bodies, etc.

But it was interesting to me and Rachel that two weeks ago we both literally woke up and said, "Today I want to make cookies." I know that baking cookies is something I regularly turn to when I need a little comfort. The kitchen immediately becomes a cozy haven from life's nuttiness as I blend the batter, methodically line up the dough, and pull the pans in and out of the oven. I love the smell in the house as cookies bake. And of course, I love how happy everyone is when they discover cookies are in the works and/or that a batch has just come out of the oven. Oh, yes, and I also like to eat them. One of the few (and I mean few) things I don't like about summer is that it's usually too warm to bake cookies so I'm usually on hiatus until the fall. But come that first cool day, there's nothing better than baking up a new batch. Everything feels good.

Rachel here: I love that my mom and I both woke up with cookies on the brain on the same morning 3000 miles apart from each other. I wonder how much of my love of baking cookies is tied to the feelings I associated with baking with my mom when I was growing up. I remember feeling special when we baked together, like I had been invited into this cozy little kitchen bubble and been made privy to an arena that I otherwise viewed as hers (since she did all of the cooking). My brother G helped sometimes (S was too little or not even born during this era), but mostly I recall getting to spend time with my mom that felt like it was ours. Plus, there were the cookies and the sitting at the kitchen table together to nibble from the first batch just as soon as they were cool enough while the second batch baked. My mother seemed so competent to me, absent measuring accoutrements for the most part and with the strength to cream butter and sugar that far surpassed my childish arms'. I figured I would never know how much salt was called for, or vanilla, the way my mom just knew. I would dutifully read from the recipe while she dutifully ignored it, a feat which always felt a little dangerous to me and which left me feeling a little bit like I was scrambling to keep up. I loved everything about those weekend afternoons baking cookies with my mom, though. I loved the mess inevitably made with the pouring of flour and sugar; I loved the wooden mixing bowl the dough would come together in; I loved the nearly sick feeling in my stomach when we were done from having tasted the batter, the chocolate chips AND the cookies. When I bake cookies now, these feelings and sensations are conjured vividly for me and, without fail, I am left feeling a whole lot of love for my mom, even if its from 3000 miles away.

Wednesday, February 24, 2010

Crazy for Cookies


Janet here: A few weeks ago, I made — or more accurately, tried to make my mother-in-law's molasses sugar cookies. We were coming up to the anniversary of her death and my husband asked me to make them. I thought it would be a nice way to remember her.

But then I looked at the recipe and it called for Crisco instead of butter and I just couldn't wrap my baking head around using Crisco for anything other than part of pie crust (and my father would roll in his grave if he knew I used anything but pure butter for all of it) so I substituted butter and they were good but not quite the real thing. (Not that I'm sure anything would have really been the real thing anyway because my mother-in-law wasn't making them, and I mean that in all the best ways.)

So when we decided to make cookies this week, I decided to try to redeem myself and make another molasses recipe, this one the Barefoot Contessa's ultimate ginger cookie from her At Home cookbook. It included the all-important molasses ingredient of my mother-in-law's tasty cookies but also included bits of crystallized ginger (a particular favorite of my husband). Although I was nervous while working with the dough — it was much drier than most cookie batter — I'm happy to report it was a success. While not a substitute for his mother's cookies — nor should they be — Peter proclaimed them tasty.

Ultimate Ginger Cookies
makes about 16 cookies

Ingredients
2 1/4 cups all-purpose flour
1 teaspoon baking soda
2 teaspoons ground cinnamon
1 1/2 teaspoons ground cloves
1/2 teaspoon ground nutmeg
1/2 teaspoon ground ginger
1/4 teaspoon kosher salt
1 cup dark brown sguar, lightly packed (I only had light brown and it was fine)
1/4 cup vegetable oil
1/3 cup unsulfured molasses
1 large egg at room temperature
1 1/4 cups chopped crystallized ginger (6 ounces)
granulated sugar for rolling the cookies

Method
Heat the oven to 350 degrees. In a large bowl sift together the flour, baking soda, cinnamon, cloves, nutmeg, ginger and salt and then combine the mixture with your hands. In the bowl of an electric mixer fitted with a paddle attachment (or if you're like me, just in a bowl where you're going to mix everything with a trusty old fork), beat the brown sugar, oil and molasses on medium speed for 5 minutes. Turn the mixer to low speed, add the egg and beat for 1 minutes. Scrape the bowl and beat for one more minuted.

With the mixer still on low, slowly add the dry ingredients to the bowl and mix on medium speed for 2 minutes. Add the crystallized ginger and mix until combined.

Scoop the dough with 2 spoons or a small ice cream scoop. With your hands, roll each cookier into a 1 3/4-inch ball and then flatten slightly with your fingers. Press both sides of each cookie in granulated sugar and place on the cookie sheets.

Bake exactly 13 minutes. The cookies will be crackled on the top and soft on the inside. Let cool on the sheets for a minute or two. Then transfer to wire racks to cool completely. Try not to eat a half dozen.

Rachel here: Without planning on it, or much discussing it, it seems my mom and I both baked cookies with other people in mind this week. Aren't we good people to know? Anyway, one of my dearest friends in the world is coming to visit for a few short days this weekend and I am immersed in an insanely chaotic couple of weeks right now so, to prepare for her visit I made cookie dough ahead of time this past weekend. Since it's a recipe I'd never used before, though, I figured it would only be wise to bake off a quick dozen to make sure they're edible. This has actually been my approach to cookie baking for the last year or so, and I have to say I highly recommend it. I make the full dough recipe and then usually just bake a dozen, either refrigerating or freezing the rest of the dough depending on when I think I'll be wanting more cookies. This way, fresh cookies are never more than ten minutes away in my house and, let's be honest here, there's nothing like a cookie warm from the oven. Plus, it's a great way to get a chunk of baking out of the way in advance when you have a busy week with an event looming at the end of it.

Anyway, the recipe I used I modified from one I found on epicurious that was featured in the July 2003 Bon Appetit. The texture is perfect, I think (and my co-taster, John, agrees). In a completely spacey pregnant moment, I forgot to put in all of the spices and nearly (like, very very nearly) forgot to put in the oats. I remembered the oats in the nick of time (like, right before I was about to put the cookies in the oven) and, at that moment, realized my complete neglect of the spices. I didn't want to over-mix the dough, though, so I sprinkled the spices on top. I imagine these cookies are a little bit better with the spices mixed into the dough and I suspect you can go a little heavier on the spices than the recipe calls for. Even with all of my errors, though, these cookies are seriously delicious. Now I just have to try to forget how much dough I have in the fridge until closer to my friend's arrival...

Oatmeal Cookies with Raisins, Cranberries, Walnuts and Chocolate Chips

Ingredients
2 c. all-purpose flour
1 tspn. baking powder
1/2 tspn. baking soda
3/4 tspn. salt
1 1/2 tspn. cinnamon
1/2 tspn. nutmeg
3/4 c. butter, room temperature
1/4 c. vegetable shortening, room temperature
1/2 c. white granulated sugar
3/4 c. brown sugar (I used dark)
2 large eggs
1/4 c. honey (for ease, 1/4 c.=4 T...easier to measure in this case, I think)
1 T. vanilla
1 c. raisins and cranberries
1 c. walnuts, broken
1 c. chocolate chips (I used bittersweet...sooooo good)
3 c. rolled oats

Method
Preheat oven to 350 degrees.
Combine first six ingredients (flour through nutmeg) in a small bowl and set aside. In your mixer, beat the butter, shortening and sugars until fluffy. Beat in the eggs, honey and vanilla. Mix in the flour mixture. Stir in the last four ingredients (raisins/cranberries through oats). Spoon batter onto cookie sheet (I used a heaping tablespoon) and bake for 10-15 minutes, until golden brown. Let sit on sheet a minute or so before transferring to a wire rack to cool. Yum!

The base for this recipe, I think, would lend itself well to anything you wanted to add in the place of the last four ingredients (though, personally, I'd keep the oats). The original recipe called for way more sugar, too, so if these aren't sweet enough for you, then feel free to increase both of the sugars to 1 cup.

Tuesday, January 5, 2010

Mookie Madness


Rachel here: So, I have to start by saying that my mother bakes cookies entirely incorrectly. I am a fastidious follower of rules and, generally, this holds true as well when it comes to baking. Cooking is one thing, an arena in which I will sample and experiment until I find the right flavor combination. Baking, however, is an entirely different beast and one in which I adamantly adhere to precise measurements and steps in the name of producing perfectly textured and flavored food. Having worked in a restaurant for the last several years, my understanding of cooking as experimental and baking as a precise art has only been reinforced time and again. However...my mother bakes a mean mookie. In case you didn't figure this out for yourself from the photo, a mookie is a cookie baked in a muffin tin, this one with a peanut butter cup in the center. I have never made them for myself, preferring to indulge in mookie eating contests with G and S when I'm visiting, but when I do I can assure you I will follow my cookie recipe precisely (as opposed to my mother's preferred version of throwing in a little salt, a little baking soda or what have you) and, sadly, I doubt that my mookies will be nearly as good. Anyway, I'll let my mom take it from here since she's the mookie master.

Janet here: I cannot claim to be the inventor of mookies. That honor belongs to a former colleague of my husband. However, the name mookie is a Reynolds original. You take a cookie and a muffin and you get...a mookie. Cuffin just didn't cut it obviously. Anyway the mookies here are traditional Toll House chocolate chip cookies. You make the cookies (aside here: I actually just mix all these ingredients into a bowl together, not separately as the recipe calls for, and come up with a general chocolate chip cookie dough...unlike Rachel) and then instead of putting them on a cookie sheet, you put them in a muffin baking tin and stuff a peanut butter cup in the middle and voila! Mookie!
I have also made these with Reese's Peanut Butter Chip Chocolate Cookies with a peanut butter cup in the middle. Delicious!
The possibilities for mookies are endless I think and I plan to explore lots of possibilities down the road....What do you think might be some good combinations?