Showing posts with label homebrewed beer. Show all posts

Friday, March 2, 2012

Beer and Chocolate. No Joke.


Mike the Gay Beer Guy weighs in on the wonders of chocolate and, yes, beer.

So who likes chocolate? Here’s a quick desert that takes about 20 minutes to make, 10 minutes to bake, and an evening to enjoy! We make this molten lava cake a few times a month ... very little “real” baking technique is required and the results are amazing. This recipe is from Epicurious, and can be doubled or halved as needed. For tonight I only made two, even though we have 4 ramekins. Did I mention it’s quick and easy?! And of course why would I pair this with anything other a chocolate beer!

Molten Lava Cake
Serves 2 (or 4...or 8)

Ingredients
3 ¼ oz bittersweet chocolate
1 ½ tablespoons butter
Pinch (or less) of salt
2 large egg yolks
3 tablespoon sugar
1 large egg white

Method
Heat the oven to 425 degrees F and grease/flour (or maybe use cocoa powder?) your ramekins. Over a double boiler (or my makeshift stainless-bowl-over-a-small-pot-of-water) melt the chocolate, butter, and salt; there will be a noticeable texture change and that’s when you’re done. Set the bowl aside to cool for about 10 minutes.

In a new bowl, beat the egg yolks and 2 ½ tablespoons of the sugar together until smooth, about 2 minutes. Fold the cooled chocolate/butter mixture into the yolks and set aside. Using another bowl, whisk the egg white and remaining sugar until stiff, but not dry... the recipe from epicurious recommends using an electric beater, but for one egg, I just do it all by hand. Fold it gently into the chocolate mixture being careful not to deflate the egg white. Divide the mixture evenly into your ramekins, put them on a pan, and pop ‘em into the oven for 10 or 11 minutes.

When the cakes are done baking, let them cool for about a minute on a wire rack. Loosen the cake from the ramekin by sliding a knife around the edge and invert the cake onto a plate. Garnish with whipped cream and/or strawberries (seriously, I thought we had strawberries in the fridge... I’m kind of upset they weren’t there).

Bière au Chocolat

Our local big brewery, the Boulevard Brewing Company, just released a batch of its Chocolate Ale here in Kansas City. The beer attracted so much attention that my friends and I couldn’t even find a bar that wasn’t sold out by the time we got there, let alone buy a bottle or two to drink at home! So Dr E, my microbiologist friend, asked me to make a version... the end result is nothing like Boulevard’s, but it’s certainly something I’m happy with. The recipe is based on my Brown Porter recipe, but without the Brown malt and of course with chocolate. By the way, I told Dr E I would come up with the recipe but that HE would have to be the brewer... this is his first beer, with my assistance of course! Cheers!

OG: 1.060
FG: 1.018
IBU: 29
SBV: 5.5%

Ingredients
10 lbs 2-Row Malt
2 lbs Red Wheat Malt
1 lb Crystal 40
1 lb unsweetened baking cocoa powder
½ lb chocolate malt
½ lb biscuit malt
½ victory malt
1 ½ oz East Kent Golding Hops at 5% AA for 60 minutes
½ oz East Kent Golding Hops at 5% AA for 30 minutes
WLP 005 British Ale Yeast (or any English yeast will do!)

Method
Mash grains at 155*F for 60 minutes or so. Sparge as usual. Boil your wort adding the hops at the times indicated; add the cocoa powder during the last 2 minutes or so to sanitize. Ferment (chocolate sludge and all!) at the lower end of the spectrum to provide minimal esters, but still retaining the English character... I went with 65*F. I think this beer works best with minimal carbonation; just the slightest hint of bubbles is my preference... think about 1 to 1 ½ volumes of CO2.

Cheers!

- Mike TGBG

Friday, February 3, 2012

Fondue WHAT?

And now, ladies and gentlemen, for our monthly dose of wisdom from Mike the Gay Beer Guy. Be still our beating hearts...


Mike here.

We’ve all been there... you know, THAT couple that invites you over for a Fondue party. Cheese, oil, chocolate - it’s all the same. Little tiny forks sticking out of center bowl warned over a tiny burner. Well roll up your sleeves and get ready to impress your friends with this spiced up version! That’s right - HOT POT.

The Chinese version of dipped meats and vegis in a broth is loaded with all sorts of flavor; you can almost use anything you want. Be warned, though, it’s not for the light hearted... this is serious entertaining food that gets spicier and more intense as the evening goes on. To make it more of an event, instead of having a whole ton of food just for the two of us, T and I invited our friend (and fellow Hong Konger to T) over to partake in this Chinese winter staple (speaking of winter... as I write this it’s 65* outside in Kansas City... yeah, winter indeed).

The components: the chili oil, the broth, the sauce, and all the fixin’s... ready? Here we go!

Chili Oil:
Szechuan Peppercorns (found at the Asian Market)
Dried Chili Peppers
Canola Oil


This should be done a day in advance. There’s no set quantitative value to how much chilis or oil to use. Use your judgement! Start by toasting your chilis in a dry pan until they develop some color but don’t burn; once done, set aside in a bowl. Using the same pan, start toasting your Szechuan Peppercorns. The peppercrcorns will release an amazing aroma, which seems like it’s a combination of hot spice, pepper (like cracked black pepper), and a sour/vinegary flavor. When the peppercorns have developed a nice flavor, combine it back with the chilis and roughly crush with a mortar and pestle (we actually don’t own one... a stainless bowl and a mini-rolling pin work just as well!). In the pan, combine the peppers and the peppercorns with enough oil to cover, heat through, and then set in a heat proof bowl to rest overnight.


Broth:
Daikon Radish
Water
Chicken (or Pork) Broth
Seasonings
Chili Oil

The broth is simple... dice the radish into 1 inch pieces. Add the water and simmer... at some point taste the broth for flavor, adjust the seasoning. After you’ve sufficiently simmered the broth, add the chili oil to taste (we found that it was more pungent rather than spicy... but use your own judgement!). This is a great time to discuss the vessel you should use: a flat-bottomed pan a few inches deep to be able to simmer enough broth to cook the fixings of your choice. As you can see form the pictures, we have a mini butane fueled stove that sits in the middle of our table... it’s kinda similar to a camping stove, but safe for indoor use. Always be safe when making hot pot!!!! At some point before serving, you’ll want to add some of your fixings to the broth, not only to enhance flavor, but to give them a head start in the cooking process... but we’ll get into the details after the sauce.

OK, here we go... a quick warning. From here on, you might be dealing with raw and cooked-slightly-rare ingredients... At no point during this meal did I ever think I was going to get any form of food poisoning. We used fresh ingredients, which certainly helps to curve the nerves. But use your judgement! My thoughts are, especially being Mike TGBG, that if you drink enough alcohol you’ll either kill everything living in your system... or at least you’ll never remember being sick!

The Dipping Sauce & Fixin’s:
Egg
Chinese BBQ Paste
Soy Sauce

Now everyone get your individual bowl. Crack your egg into your bowl, add a dab of BBQ Paste and some soy sauce, and swirl it all around with your chop sticks (you know... chop sticks, right?!). You’re going to put your fixings into the simmering broth, let them cook to your liking, and plop them into your sauce. And then eat of course!!! When you get your broth into the middle of your table (on the flame) it’s probably a good time to add whatever long-cooking items... we had fish-balls, Chinese Meatballs, and mushrooms. Also on the table (and we had EVERYTHING there): beef, chicken, prawns, squid, muscles, noodles, cabbage, tofu, fermented tofu, more mushrooms... you name it. This can be as complicated or as simple as you want... just prep everything in advance and instant HOT POT!!!!


Imperial Mild

For this evening, I had on hand an Imperial Mild that I had brewed as a kit from Northern Brewer (http://www.northernbrewer.com). For those who don’t know, a Mild (as opposed to the hoppier “Bitter”) is an English Pub beer, usually about 3% or so ABV (it’s actually really hard to find one commercially... I know of no one in the US who makes one or imports one, and I’ve heard it’s very rare in Europe too!). This recipe calls for the same ingredients, just a little higher in alcohol, at about 5.5% ABV. Full of malty flavor and some caramel sweetness, this beer paired PERFECTLY with the hot and spicy Hot Pot. For my winter brewing, I plan most beers around extract recipes so I can brew indoors without having to stand in the outside cold for hours... here is the recipe just as I made it. Maybe over the summer I can plan a full-mash version!

OG: 1.062
ABV: 5.5%

Ingredients
6 lbs Munton’s Amber Dry Malt Extract
1 lb Corn Sugar
4 oz each English Dark Crystal, Extra-Dark Crystal, and Pale Chocolate Malts
2 oz Victory Malt
2 ½ oz Fuggles at 60 minutes
½ oz Fuggles at 15 min
WY1187 - Ringwood Ale Yeast

Method - Back to Basics... partial wort boil on the stove

Crush and steep your specialty malts (in a mesh bag) in about a gallon of 160* water for about 30 minutes. After 30 minutes, collect about 4 gallons in your kettle as you drain your bag of crushed grains (don’t squeeze out every last bit of liquid!!! Just simply drain the bag of grains over the kettle! When the bag doesn’t drip, throw it away). Off heat, add the extract to the water, stir to dissolve well, and bring the wort (solution of sugars) to a boil. When you achieve boil, add your 60 min hops (you can cover the kettle to help a boil come about, but then the lid should be off until you’re ready to cool the wort); boil for 45 min, add your 15 minute hops and corn sugar, and continue to boil for the remaining 15 minutes. When the hour boil is over, cool the kettle in an ice bath in the sink (or bath tub or whatever). While the kettle is cooling, prepare your fermentation vessel... sanitize, sanitize, SANITIZE!!! The wort in the kettle is essentially sterile (although there are spores and other potential contaminants still in solution, the nasty and potentially beer-hazardous stuff has been thoroughly killed off) and you want to give your yeast the optimum and clean environment to work! When the wort is cool to the touch (ideally around 60*-70*, but any temperature which won’t kill your yeast will work), pour it into your fermentation vessel; food-grade plastic buckets are easy, but those with carboys will need either a friend and a funnel or to siphon. Your fermenter should be able to hold 6 ½ gallons of liquid... when the wort is in the fermenter, top off with clean spring water or previously boiled and cooled tap water to about 5 ½ gallons; you will have about a gallon of open head space. From here, the easiest thing to do is just pitch your yeast and cover the vessel... plastic buckets can accommodate a sanitized airlock in the lid or use a sanitized piece of foil for your carboy (I only use stoppers and airlocks for any beer I’ll leave in the fermenter for longer than 2 weeks). My procedure is a little more controlled: I make sure my wort has cooled to 60*, pitch my yeast, and then raise the temperature to 65* (assuming the temperature inside the carboy will be around 67*-68*) through the use of a heat wrap and temperature controller. Ferment until the beer has visibly stopped moving and the majority of yeast has fallen out of suspension... and then wait another 3 or 4 days after that!! Keg or bottle and carbonate VERY low... I actually prefer this beer almost still. If you bottle and add priming sugar, use ⅓ to ½ of what you would normally add. For you keggers out there (my included), just put enough head pressure on the keg to serve!


Cheers
- Mike TGBG

Friday, November 4, 2011

Pizza and — What Else? — Beer


Hi Janet, Hi Rachel

Halloween is over, Thanksgiving is just around the corner, Christmas is just a stone’s throw beyond that. Nothing screams fall in New England more than pizza.

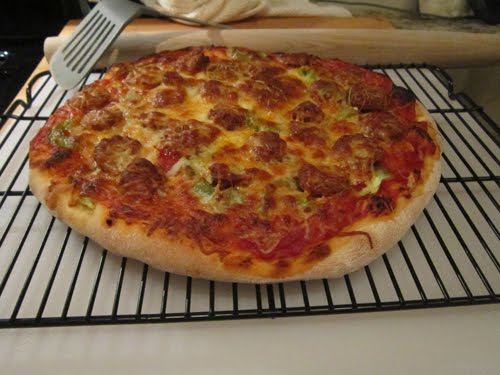
Ok, you got me... pizza screams nothing of fall in New England. But hey, this is a great recipe and I even remembered to take pictures!


Fresh Pizza Dough
This recipe is from a book, Artisan Bread in Five Minutes a Day by Jeff Hertzberg and Zoe Francois, given to me by my very good friend and second-mother, Julie “Miss Sunshine” Wallace. Her son and I were great friends in college, often finding ourselves at the Wallace house on the weekends to get away from the evil dorm food. Miss Sunshine always had homemade meals, fantastic cookies, and of course fresh bread! She still makes recipes from this book and I’m so glad she passed the good word onto me... this recipe is directly from the pages, even though I make a half batch rather than the full amount listed. Enjoy!

Ingredients
(this is the half-batch version)
1 ⅓ cups lukewarm Water
2 ¼ teaspoons Granulated Yeast (we buy one of those jars in the bread aisle
2 ¼ teaspoons Salt
1 ½ teaspoons Sugar
2 tablespoons EVOO
3 ¼ cup all purpose Flour

Method

Combine all the ingredients except for the flour; you can use a bowl or a plastic container with lid. Mix in the flour, one cup at a time... you can use a stand mixer, but a spoon in the plastic container works just as well (oh you may need to add more water or flour depending on how the dough feels in the moment). Cover your dough (but not air tight) and allow to rest for about 2 hours. You can certainly use the dough immediately after the rise, but it works better if you chill it down in the fridge.

When you’re ready to use the dough, preheat your oven to 525* F (You just keep your pizza stone in the oven ALL the time, right? I mean for REAL...you just might as well, because you should be using it all the time... RIGHT?!?!?!). Prepare all of your toppings... for our pizza we had green peppers, garlic, and chorizo sausage in addition to the “normal” marinara and cheese.

Pull off half of the dough and shape it into a ball by pulling on the top of the round and tucking it under to the bottom, turning the round 90 degrees after each pull and tuck (no this isn’t plastic surgery). Roll the dough onto a floured flat surface... in order to get the pizza onto the pizza stone, you’ll need to then get the dough to a pizza peel covered with corn meal (you can use the underside of a flat sheet pan as well). Move quickly so the dough doesn’t get stuck to the pizza peel... sauce, toppings, cheese, and GO! Shake the pizza onto the pizza stone in the oven and bake for 10 minutes. Check and continue baking if required. Let the pizza cool for a bit and serve...preferably with a fantastic beer...like this one.


Brown Porter
The city where I work is right next to a military base, which serves as a teaching college for American officers, as well as for officers from our allied countries. We are very good friends with the British family, who traded some of my IIPA beers (from my last post) for some English bottles... I think I made out the best of the deal! The Fuller’s Porter, pictured, was among the bottles I received, which according to the officer and his wife, was special ordered from the UK. I may have shared my Brown Porter recipe before, but it’s something I make time and time again, and continually improve in every new brewing experience. This really does remind my of New England Fall, so I think it’s time for another round -

OG: 1.052
FG: 1.013
IBUs: between 25-30
ABV: 5%

9 ½ lbs base malt, preferably British Continental (Marris Otter, for example)
1 lb Brown Malt
1 lb Crystal 40
½ lb Chocolate Malt
East Kent Golding hops - 25 IBUs at 60 min, and then a little flavor around 5 or 10 min
I use WLP013 or WY1028, but any British yeast will do depending on your tastes

Mash at 154*, sparge and lauter per the norm, boil, cool, ferment at 67*, keg and condition. I’m a big fan of little to no additional carbonation for these types of beers... 1 to 1 ½ volumes of CO2 at most for my tastes!

Some variations ideas (because you shouldn’t just do my recipe... make it your own!!):
Play with the amount of Chocolate Malt; I like to taste the Brown malt, so I use less Choc! Maybe substitute Fuggles for the EKG hops. Try adding a bit of Cocoa Powder, making a Chocolate Porter. Or try adding Pumpkin Spice mix

If you sub a yeast strain (which I highly recommend trying), make sure to compensate the attenuation rate of the yeast with the mash temperature. For example, if your yeast doesn’t attenuate as much, you need to make a more fermentable wort (mash temp needs to be lower).

Cheers

Mike TGBG

Friday, July 1, 2011

Thinking Ahead to Fall....And Beer


Mike the Gay Beer Guy is obviously more forward-thinking than we are. He's thinking ahead to fall and what would be best served with an IPA or a bourbon barrel porter, while we're wondering what we'll make for dinner ... tonight. Anyway, it's good to have people like Mike on this Earth. Thanks to him, everyone is better prepared. :)

Here are Mike's thoughts.


Hi Janet, Hi Rachel -

My tastes in the beer I drink change according to the seasons, which means that now is the time for a big, flavorful IPA or a fantastic Belgian Saison, Tripel, or Witbier. As a brewer, I often forcing myself to think a month, two months, or ever 4-5 months into the future. Thus, this month’s posting is dedicated to the food and beer of the colder winter months. Why would I talk about stewing meat (and heating up my entire kitchen) in July when it’s more than 90 outside? Well, that’s simple ... so I can brew my Bourbon Barrel Porter, of course. And what goes well with my Bourbon Barrel Porter? Beef Stew...

Beef Stew feeds 6-8 people, or 2 people for a few days of lunches and dinners. Stew is my boyfriend’s specialty. We were at the farmers’ market the other day and bought all sorts of fresh ingredients. That’s the beauty of stews: You can almost toss anything in! Stews are best, in our opinions, are best cooked one night and eaten the next, or even later in the week. As you’ll see, we cook the stew and leave it on the stove overnight to cool.

We also like using thick-cut beef chuck steaks rather than the stew meat available at most supermarket butcher counters. The fat content is higher (which means more flavor), it’s more cost effective, and the meat looks so rustic as it falls apart after cooking for a few hours. Enjoy!

Ingredients
EVOO
Salt/Pepper to taste
3 ½ pounds thick-cut beef chuck
½ bottle of red wine (we used merlot because it was open)
2 medium onions (or 1 large onion)
1 pound carrots
1 pound celery
1 fennel bulb
5 cloves garlic
Water (or beef stock)
2 bay leaves
Small palmful of dried thyme
Roux (to thicken the stew... if you want)

Method
Start by cutting your veggies into chunks. Leave the garlic cloves relatively whole (there’s nothing left to do if you crush them with your knife to get the paper off) and leave the beef in its steak form.

In a large Dutch oven (or the large stainless pan Theo used the night we cooked), heat a few tablespoons of EVOO over medium/high heat. While the EVOO is heating up, wash and dry your steaks and season them liberally with salt and pepper. (It is very important that the steaks are dry. A dry steak will sear nicely, creating all sorts of fond on the bottom of your pan, which means more flavor... if the steaks are wet, the meat will steam and not sear... not so much flavor)

Once the pan is hot and the EVOO is smoking, sear the steaks one at a time if you have a pan that won’t fit them all. Each steak should be a nice shade of brown, not burnt but not too brown ... and of course, we’re not worried if the steak cooks all the way through, since it will be cooking for a few hours!

When the steaks are seared and resting, it’s time to build the base of the stew. Deglaze the Dutch oven with the wine... almost any wine will do, as long as it’s not too sweet. Return the Dutch oven to the heat (you remembered, of course, that when deglazing with alcohol to do it off the flame) and scrape up the fond from the bottom. Return the steaks to the Dutch oven, adding the juices that have accumulated and add the veggies and garlic. Cover this with water (when we made it, I guess technically it was a braise, since water only came up half-way to the meat and veggies) or beef stock and bring to a boil; when the stew comes to a boil, reduce to a simmer, cover with the lid, and add the bay leaves and thyme. Adjust your seasoning (we’ve found that a healthy punch of salt and 4-5 grinds from the pepper mill work well). Simmer the stew for about two hours, or until the steaks fall apart. When time is up, turn off the flame and let the stew rest overnight on the stove (keep it covered).

The next day, fish out your bay leaves ... we do it first, so that we don’t forget! Next, take out the beef steaks and cut them into pieces resembling your veggies ... the meat should be tender, so if it just falls apart. Return the stew to a simmer and enjoy. If you like, use a roux to thicken, but it’s not necessary (we covered a roux on one of my previous posts ... but if you’ve forgotten, here’s a quick recap: equal parts fat and flour ... heat the fat, stir in the flour, cook stirring often until the mixture is about the shade of light peanut butter and then go for an extra minute, mix this into the stew ... start with 4 tablespoons each butter or EVOO and 4 tablespoons flour, add 1 tablespoons of the roux to the stew at a time until it’s to your desired thickness). Enjoy the stew with the Bourbon Barrel Porter. (I actually drank an Oaked Arrogant Bastard from Stone Brewery when we ate the stew; this certainly got me in the mood!)

Bourbon Barrel Porter
On to the main event ... there’s a lot of waiting involved in this recipe, so I suggest leaving yourself a good five months to get all the tastes in order! This recipe is based on celebrated homebrewer Denny Conn’s Imperial Bourbon Barrel Vanilla Porter, which also sounds just as good!! Cheers!

OG - 1.075 (before adding the bourbon)
FG - 1.017
IBU - 35
ABV - about 7.5% before Bourbon

13 lbs American Two Row Malt
2 ½ lbs Munich Malt
1 ½ lbs Brown Malt
¾ lbs Crystal 120
¾ lbs Crystal 40
¾ lbs Chocolate Malt

Mash at 152* and Sparge as usual (I plan my recipes for 6 gallons at the end of the boil)

Denny uses an addition of Magnum hops, but I prefer East Kent Goldings in my Porters... I usually go for a 60 min addition, and a 20 or 10 minute addition. It works out to be 1 ½ to 2 oz at 60 minutes, and ½ oz at 20 or 10 minutes, depending on how much hop flavor you like in your beer.

Denny usually ferments with his own proprietary strain (buy it commercially from Wyeast as WY1450), but I prefer my house strain, Pacman. You could also use WLP001/WY1056/US-05 which is essentially the same Chico strain (Sierra Nevada), but a nice English strain, such as WLP013/WY1028, both named London Ale, could be nice as well. I ferment Pacman pretty low... like 60-63. I suggest Chico around 65-68, and I would ferment any English strain with restraint, since you want to restrict the ester profiles somewhat ... just my suggestion, do what you want!

When you pitch the yeast, soak 1-2 oz of American Oak Chips in about 2 cups of Bourbon. As the beer ferments, the oak flavors will be released into the bourbon; it will smell fantastic! Let the beer finish fermenting completely, and then let it sit another week. When you’re ready to keg, add half of the bourbon (leave the oak behind!) and store the rest in a clean bottle; it wouldn’t be a bad idea to sanitize the bottle, but there’s probably enough alcohol in the bourbon. Let the beer age for a few months and taste every now and then. If you think it needs some more bourbon, of course add more! I carbonate this beer lightly, so as not to drive off the subtle flavors.

Friday, March 4, 2011

We'll Have Beer with that Chicken Please


Mike the Gay Beer Guy is back for his monthly posting on fabulous pairings with beer. Up this month, a delicious chicken dish. You don't have to brew your own beer to make this, of course, although if you're inspired to take that one, Mike's the guy to show you how...

Hi Janet and Rachel -
First off, I have an announcement to make! Due to the GREAT success from my entries in LTIR, I have decided to start my own beer blog. Basically, it comes down to this: I have received so many great comments about my posts, but so many folks read the beer lingo like a foreign language. In order to go into more beer related detail (and to cover a wider range of ideas), it became necessary to go down a new avenue. Of course I’ll still be writing for LTIR once a month, but I’ll make sure the focus is food related.
Check in at mikesbeerguyblog.blogspot.com regularly for posts about beer, brewing, eating, and everything else out there!

One of my favorite styles out there is the Belgian Dubbel — one sip and you can taste so many things: malt, dried figs, raisins, spice, amongst others. I have made my Dubbel recipe a few times, but by far the best batch is the first one from 3 years ago. I didn’t really know what I was doing back then, so I’m surprised the bottles I have left are still palatable. As this is a GREAT beer to drink, it is also pretty easy to cook with, too! How do I justify cooking with a beer I’d want to drink? Not easily! But this one certainly lends itself quite well to the purpose (maybe that’s why I have so many bottles around the house?!?!?!). Like wine, I recommend saving the REALLY good stuff for drinking... I would never cook with a Trappist Dubbel, but there are some great domestic varieties available for both as an ingredient and consumption that don’t carry the subtleties of great Belgian beers and, quite honestly, don’t cost as much.

For this recipe, I thicken my sauce with a roux, but feel free to omit the extra fat
and reduce the sauce naturally; keep in mind that as beer boils, it’s going to get more bitter, and you might find it necessary to add some sugar or honey to compensate. You also don’t need to use a Dubbel. A nice amber or brown ale would work nicely! Just make sure the beer is balanced towards the malty end of the spectrum, rather than the hoppy end. I’ll list some possibilities in the ingredients! Bon apetite!


Chicken and Herbs in a Belgian Dubbel Sauce

Makes 4 servings

ingredients
2 tablespoons butter (Everything tastes better with butter!!)
2 tablespoons (plus maybe a bit more) Flour
2 tablespoons EVOO (maybe more)
4 boneless/skinless chicken breast halves, cleaned and patted dry with paper towels
2-3 cloves garlic, minced
1 medium shallot or 2 small shallots, minced or in thin slices
1 12-oz bottle of Belgian Dubbel Beer
1-2 teaspoon dried tarragon (or whatever herb you having available... Thyme? Sage?)
1 bay leaf
Salt/Pepper to taste
For the beer, I of course use my own (the recipe follows)... if you don’t brew or have a seemingly endless supply in your beer cellar, the classic Dubbel example comes from
Westmalle, one of the six remaining Trappist breweries in the world. Other examples you
should try come from Chimay, New Belgium, or even Allagash breweries. I’m also a fan of
the Bornem Dubbel, but I would save it to drink... I don’t think it would taste good in cooking, although I admit I’ve never tried it! You might also consider trying Dogfish Head’s Raison d’Etre or maybe even Newcastle; I have tried this also with some of my English-style beers with GREAT succes!

method
Start by making your roux. Melt the butter in a small pot over low heat. When the butter has melted, add the flour and stir with a wooden spoon (or a whisk) until you have a creamy paste. Although ideally you should have equal amounts of fat and flour, I often need a touch more flour. Continue to cook the mixture over low heat for 10-15 min, or even a little longer. Your roux should come to the consistency of light peanut butter, but a little lighter or darker is fine! I’ve read that you shouldn’t use butter if you want to cook the roux past a light brown stage, but I’ve certainly gone darker and never had a problem... feel free to substitute a different
fat for the butter if you feel uncomfortable (or suddenly health conscious).


In a 12-inch skillet or dutch oven (make sure whatever you use has a lid), heat the EVOO over medium/high heat. This should be done as the roux is cooking, maybe a few minutes into the whole process. Reduce heat to medium or less and brown your chicken on each side (make sure it is seasoned with salt and pepper), maybe 4-5 min per side. Once the chicken is browned, remove it from the pan to a plate. Add the shallot and garlic to the now chickenless pan and saute for a few minutes until everything has been cooked through; you may need to add some more EVOO.

When the shallot and garlic have cooked, deglaze the pan with the beer, scraping up all the bits from the bottom of the pan. Add the tarragon and bay leaf, and bring the pan up to a boil. Add your roux and reduce the heat to low (simmer); cover and cook for 20 minutes. When adding the roux, start by incorporating about half; if you want your sauce thicker go ahead and add more. (You can actually store unused roux in an air-tight container in the fridge.) During the last 5-8 minutes, depending on how thick your chicken breasts are, add the chicken back to the pan to finish cooking and to heat through. Serve with rice, mashed potatoes, asparagus, green beans, roasted carrots, butternut squash, even corn (as we used)... the ideas are endless!

Although you could drink a nice Dubbel with this dish, I actually think it would be more interesting to go with something somewhat sour — a nice Lambic (please nothing too vinegary), either straight (hahaha, even I laugh) or with fruit, would be great. Maybe try something from Jolly Pumpkin Brewery or possibly even a Saison, the classic example being Saison Duont. For our dinner, I paired this dish with a bottle from my first even hard cider. I still think it needs a few more months to go, but overall it worked well; you might want to try Woodchuck or possibly Ace Pear.


(Beer) Recipe of the Month

This is the first recipe for a Dubbel that I brewed; since I was then a new brewer, the
recipe is based on 5 gallons at the end of the boil, rather than the 6 I use now for most of my recipes. Don’t hate me. I’ve tried a few different yeasts for this too... but I keep coming back to the Chimay yeast, which you can buy commercially or even culture from the bottle! I’m not worried about IBUs (bittering units) for this recipe, since most of bitterness drops out as you age this... I’m sure this Dubbel will keep for at least 5 years, if not longer! The bottle I used for making the chicken was from 2009... notice how it was CRYSTAL clear just a bit longer than 2 year later!

Belgian Dubbel
OG 1.068, FG 1.010, ABV 7.5%
10 lbs Base Malt (try to find something European)
1 lb Dark Candi Syrup
½ lb Cara Munich Malt
½ lb Special B Malt
½ lb Cane Sugar (Table sugar)
1 oz Tradition (usually 5-7% AA) for 60 min
WLP500 - Trappist Ale Yeast (make an appropriate starter!!!)
Mash at 149*. Ferment starting in the upper 60*s and let the sucker rise up to ensure
fermentation has completed! Traditionally, this beer is served with a high carbonation, but I like something in the mid range. Honestly, it’s your beer, it’s up to you...

For info on how to brew beer, check out my blog at mikesbeerguyblog.blogspot.com!!! Other future topics include yeast starters, pairings, gadgets, and all other things beer related!

Friday, February 4, 2011

Beer for All


As part of our plan to add more bloggers to the LTIR mix, we're happy to introduce Mike, the Gay Beer Guy, as a regular columnist. He first posted a fabulous beer/food pairing post in December and we got a good response from folks, so we asked Mike, who we've known for years, if he'd be game to become a regular. Happily he was.

If you've ever thought about brewing beer but weren't sure how to go about it, or maybe you just like to think about beer and drink it, this column is for you. Mike will be posting the first Friday of the month, offering ideas on how to brew different beers and letting us know how he's doing in his beer experiments. Let him do the failing for you! You can just pick up on the successes. (Oh by the way, Mike is a mighty fine homebrewer. He just entered 3 beers in the Upper Mississippi Mashout, a beer competition out of Minneapolis that is the 2nd largest in the USA, and his Barleywine won a silver medal, and his Light Belgian Ale (which we've had the pleasure of tasting) won a gold.) He'll also periodically add some food ideas to go with his beers. So, without further ado, heeerrre's Mike!


Thank you both SOOO much for including me in Life Told in Recipes; I’m so excited that I’m not quite sure where to begin ... maybe describing how I got started brewing, especially since I’m not the stereotypical person to do something like this. First a bit about my formal background: I have a bachelor’s and a master’s degree in violin performance (technically, I also have a performance certificate) and have studied with some of the greatest musicians and teachers in the world. In addition, to being a professional musician (I have a very nice freelance and teaching career so far), I also have interests in food (that’s why I get along so well with LTIR) and in long distance running. I have completed a few half-marathons and one full marathon. Oh, and by the way, I’m gay (not that it’s anyone’s business, but don’t you think it’s odd to have a gay long-distance running violinist who also brews beer?!?!?!?!).

So what does this have to do with beer? Well, absolutely nothing. But after grad school, I found myself working with a few beer guys. We were working as stage managers for a music school (as a musician, this was great!! I heard every major artist to come through Boston — Gil Shaham, the Emerson Quartet, the Boston Symphony Chamber Players — just to name a few), and often we would find ourselves at a pub after closing the concert hall for the evening. These guys who I worked with (no no, they weren’t gay, too) had brewed together before; I tried to get them to brew with me, but they kept putting me off. So I took it upon myself to research (like the good Virgo I am) the craft, order equipment and ingredient kits, and away I went!

At the time, my roommate and I were renting the basement apartment out of a house in Brookline. We had a microwave, convection oven and electric hot plate nicely furnished by our landlords who lived upstairs, but that wasn’t going to cut it for boiling 3-4 gallons of wort (aka unfermented beer). I approached my landlords with the idea of using their kitchen and gas range for my new interest, and they welcomed me with open arms. Ah, my first batch...I vividly remember the smells, nervously transferring the liquid from kettle to fermenter, and anxiously checking to see if fermentation had started, finished, and of course if I had ruined anything!

I maintained somewhat of a musical life, even though I was working full time. Although I was out of school, I sometimes took lessons with my former teacher, and religiously attended his summer festival in Maine during the month of July. At this festival, I met my good friend Tim, professor of viola at Penn State (ironically, in the last few weeks, he and I have been having many a conversations about brewing. His wife bought him a startup kit for the holidays, and I’ve been coaching him through his first batch). In addition to being a fantastic musician and violist, he is an expert on beer, has a palate like none other, and I trust his opinions exclusively. If my beer could pass his tastes, I knew I had something going for me! He took one sip, and ever since has looked forward to my latest concoctions every summer (and tried to convince me to open a pub!). He has even encouraged me to enter some competitions, make styles I had never thought about, and even asks my violin playing every now and then.

Eventually I moved to Kansas City, and here I am. My violin playing has GREATLY improved and my beer making has evolved not only into personal enjoyment but is a crowdpleaser for all my friends. I certainly don’t think of myself as an expert on beer or brewing (although I find I have no trouble talking to anyone about the subjects!), but I have, since starting out, won a few medals from competitions!

The artist in me LOVES spaces: With beer, much like a blank canvas or a quite concert hall, I can work in a flavor space. What experience do I want the drinker to have? What food might it go with? Even technical aspects: what yeast, what hops, what color? There are so many things to think about. Only once did I have a recipe I loved after the first batch. For most it’s like sanding down the chiseled marble sculpture; I always return to it, working out the rough edges until it’s smooth. For a violinist, always striving to produce the ultimate for the craft, much translates to the beer world (ok ok, I admit it’s not EXACTLY the same worldliness as playing Brahms or Beethoven). But I DO think that being a successful brewer, like being a successful chef or painter or whatever, requires 80% artistry. The other 20% is a balance of technical skill, chemist, mad scientist, and of course someone who likes to drink!

Hope you enjoy this month’s recipe!

-Mike TGBG (The Gay Beer Guy)


Recipe of the Month
Dry Stout
Brew sometime in February so it’s ready to serve by St. Patrick’s Day.

In the United States, the two most popular styles to brew, whether at home or in the professional brew pub, are pale ales (or a stronger version being an IPA) and stouts; both can be made with their traditional European roots, or Americanized as we’re finding more and more. To be honest, I usually have very little interest in stouts. If I want something easy to drink but still with a lot of flavor, I usually turn to the Scottish ales or British pub ales. But I’ve always brewed this recipe around St Patrick’s Day (always meaning in the last 3 years I’ve been brewing, of course!). It’s an instant crowd pleaser (come on... who DOESN’T like a Guiness). It’s also very smooth, so you can drink a few pints and not fall over! But best of all, with dry stouts you can throw out the stereotype that all dark beers are thick, syrupy and full of alcohol. Of course there are other styles of stouts, and other dark beers, that do fall into this category, but not this one! Because I brew this beer in the cold winter months, I don’t think I’ve ever done an all-grain batch (there’s nothing quite like standing outside over my propane burning in sub-freezing temperatures!).

Looking back at my notes, I did 2 extract batches which produced an “OK” result, and 1 partial-mash batch with some extra ingredients that produced an AWESOME beer! My recipe is based on Jamil Zainasheff’s recipe from Brewing Classic Styles, but I’ve changed it slightly over the last few years to suit my tastes. I make it a little more bitter/hoppy and then use my house yeast, which rounds out the malt characteristics and accentuates the hoppy and minerally flavors (I feel this blends very well with the roastiness of the dark grains). When I brew this in the next week, I’m going to split my batch (or maybe even brew a double batch) so I can try WY1945, which is Northern Brewer’s proprietary NeoBritannia strain (re-pitch from a few other batches I’ve done). Based on what I’ve tasted so far, I think it has potential to be good! Cheers!

Dry Stout - Partial-Mash
OG 1.041, FG 1.009, IBU 34, ABV about 4%

ingredients
2 lbs Base Malt. Although I use American 2-Row for just about everything, this beer needs a little TLC. Use something British!
2 pounds flaked barley
1 pound roasted barley
2 ½ pounds Light DME
2 ounces 5.4% AA East Kent Golding hops - 60 minutes
Pacman Yeast. Use WY1056, WLP001, or US-05 as a sub. You could also try an English or Irish Ale yeast (Jamil recommends an Irish Ale yeast), but it probably won’t attenuate as much, resulting in a possibly sweeter and more estery beer. Again, this time around I’m going to use a pitch of WT1945

method
Mash grains low around 147-149* F. I’ve fermented Pacman as low as 60* without any attenuation problems, resulting in a very clean profile that works well for this style. I would ferment any of the other American yeasts around 65*. When I try the WY1945, I’ll ferment it in my basement, where the ambient temperature is around 65* as well. Carb it low and serve on Nitrogen if possible!

Here’s what I’m working on now. I’ll let you know how they do next month.

On Tap
Keg 1 - Nut Brown Ale kit from Northern Brewer
Keg 2 - Scottish 60/-
Keg 3 - Dark Saison Ale with Brettanomyces (aging)
Keg 4 - Light Belgian Ale with Brettanomyces (aging)

Fermenting
Brown Porter

On Deck
Dry Stout with WY1945. I’ll brew it this week so it’s ready for St. Patrick’s Day and my next post
Maybe a Belgian Dubbel
Maybe a Belgian Tripel. I’ve never brewed one of these before